Talent Finder
Talent Finder is your employee directory. Here you can browse, search, filter, and take action on your talent pool — from creating succession plans to bulk-importing performance data.
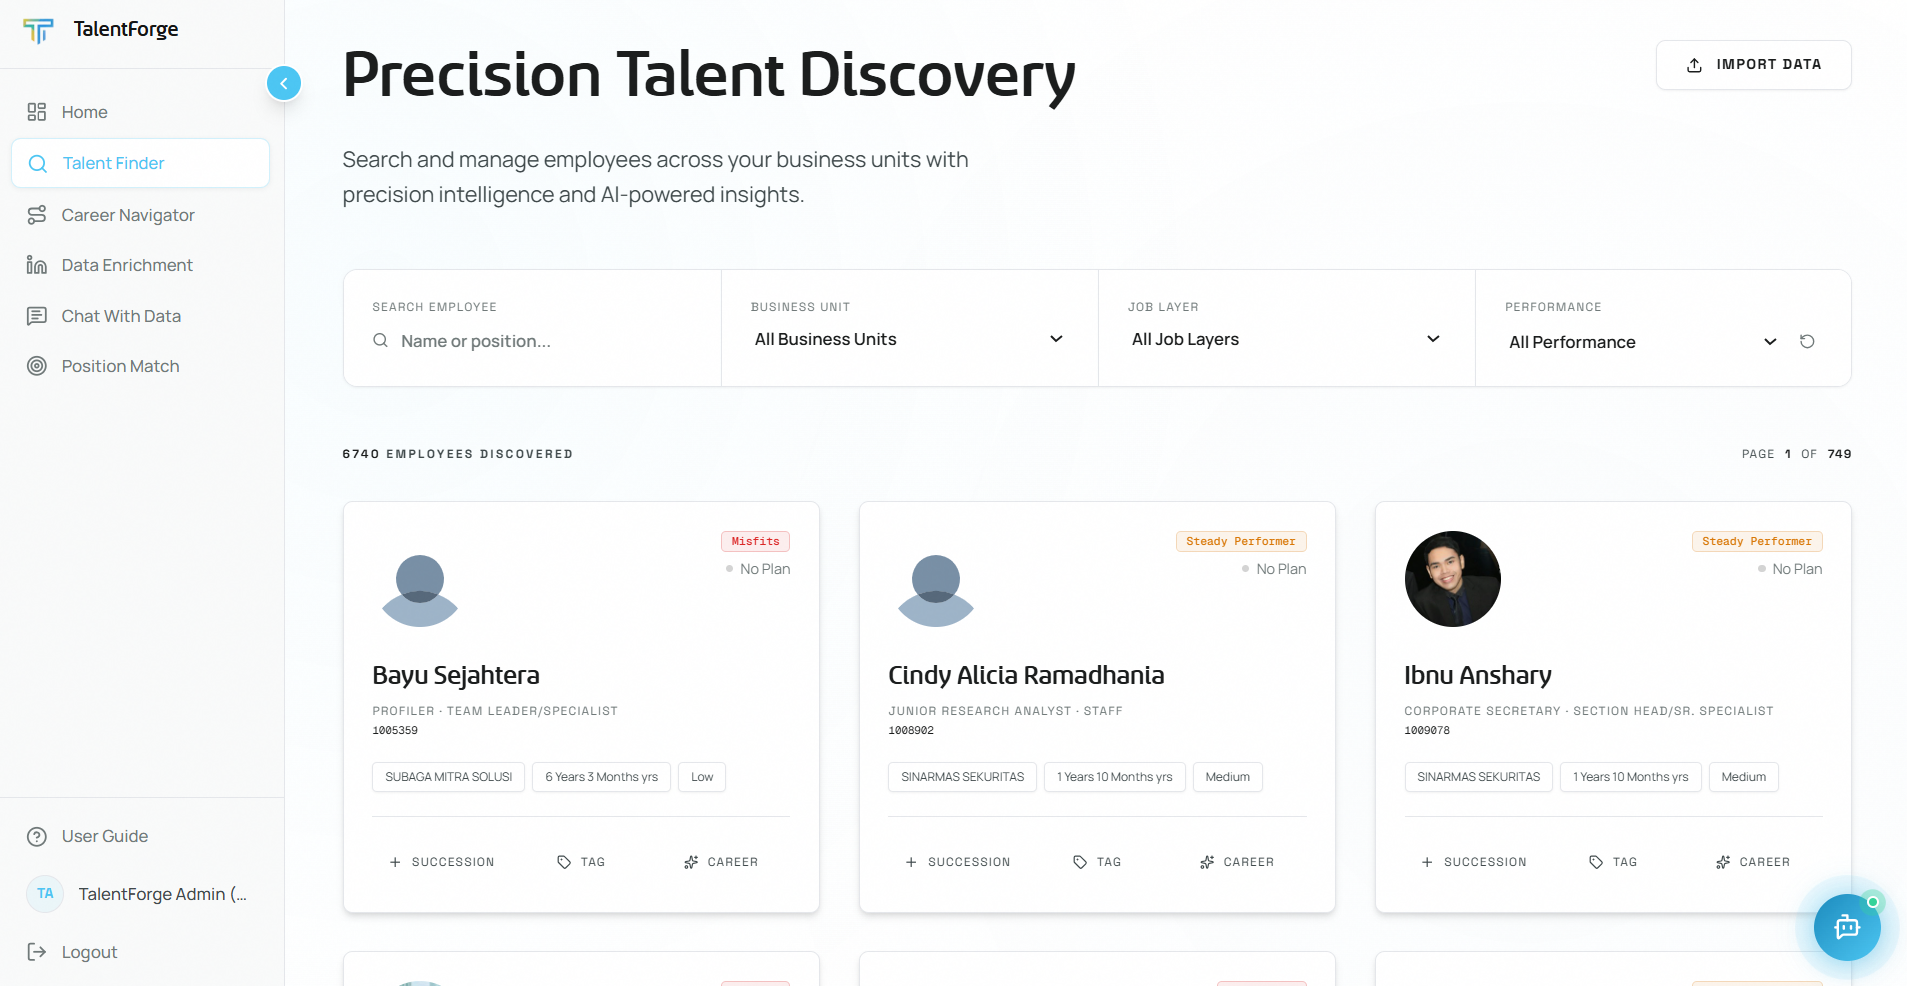
Browsing & Searching Employees
Browsing:
- Employees are displayed as wide result cards in a single column, 20 per page, with pagination at the bottom.
- Filters live in an animated left pane beside the results, so you can refine your list without losing your place.
Searching (name, job title, and work history):
- Type a name, job title, or keyword into the search bar at the top.
- Results update automatically as you type — no need to press Enter.
- Search now looks beyond the current role: typing a role such as "business analyst" matches employees who hold that role now or held it in the past, using their LinkedIn-derived work history (
dim_work_experience). - When a card matches on a past role, it shows a "Matching experience" block listing the relevant prior positions, with your search terms highlighted so you can see exactly why the person matched.
- Clear the search box to return to the full list.
💡 Tip: Work-history search is great for finding hidden skills — e.g., search "data engineer" to surface people who did that job earlier in their career even if their current title is different.
Filtering: The left filter pane is grouped into Highlights, Organization, and Role & Performance:
| Filter | Options |
|---|---|
| Potential Talent (toggle) | On/Off — show only employees tagged as high-potential |
| Critical Role (toggle) | On/Off — show only employees in business-critical roles |
| Business Unit | Your assigned BUs (e.g., SINARMAS ASSET MANAGEMENT, SINARMAS SEKURITAS) |
| Job Layer | Staff, Officer, Team Leader, Section Head, Dept Head, Division Head, BU Head, CEO |
| Performance | Low, Medium, High |
- The dropdowns use an accessible list picker (fully keyboard- and screen-reader-friendly) — use the arrow keys and Enter, or click, to choose an option.
- The Potential Talent and Critical Role toggles map to the same criticality tags you set with the ◇ Tag button on a card.
- Filters are cumulative — you can combine multiple filters and toggles at once.
- Click Reset Filters to clear everything and go back to the full list.
💡 Tip: Turn on Potential Talent and set Performance to High to quickly shortlist your strongest people for development.
Common mistakes to avoid:
- Forgetting to reset filters or toggles — if you see fewer employees than expected, check that no filters are still applied in the left pane.
- Searching by employee ID instead of name — the search bar searches names, job titles, and work history, not IDs.
Understanding Employee Cards
Each card shows a quick profile of the employee. Here's what every element means:
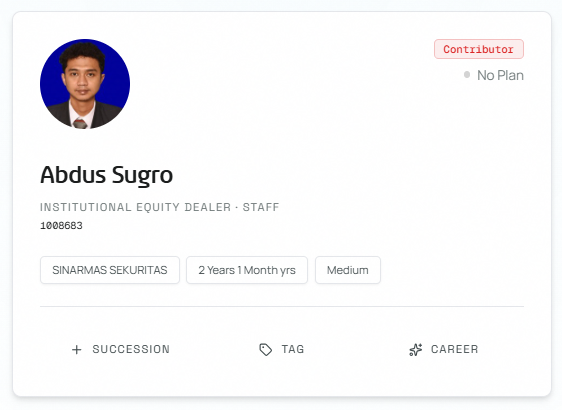
| Element | Where it appears | What it means |
|---|---|---|
| Photo | Top-left | Circular employee profile photo |
| Talent Class badge | Top-right corner | The employee's position on the 12-box talent matrix (e.g., "Contributor", "STAR Leaders", "Growing Talent") — see the Reference section for the full matrix |
| Plan Status dot | Top-right, below Talent Class | Indicates whether a development plan exists — gray dot = No Plan, colored dot = plan in progress |
| Name | Center | Employee's full name |
| Position · Job Layer | Below name, uppercase | Current job title and job layer separated by a dot (e.g., "INSTITUTIONAL EQUITY DEALER · STAFF") |
| Employee ID | Below position | The employee's unique ID number |
| Business Unit chip | Tag row | The BU the employee belongs to (e.g., SINARMAS SEKURITAS, SINARMAS ASSET MANAGEMENT) |
| Tenure chip | Tag row | How long the employee has been with the company (e.g., "2 Years 1 Month yrs") |
| Performance chip | Tag row | Current performance rating — Low / Medium / High / Very High |
| + SUCCESSION button | Bottom action bar | Opens the Create Succession Plan modal for this employee |
| ◇ TAG button | Bottom action bar | Opens the Tag Profile Criticality modal to mark as Critical Role or Potential Talent |
| ✦ CAREER button | Bottom action bar | Opens this employee's full Career Navigator page |
💡 Tip: The Plan Status dot is a quick signal for at-risk talent — if a high-performing employee shows "No Plan", they have no active development plan. Creating one helps with retention.
Creating a Succession Plan
You can create succession plans directly from any employee card.
- Find the employee you want to create a succession plan for.
- Click the "+ Succession" button on their card.
- Choose one of two plan types:
Option A: Succession Plan for a Position
- Select "Create succession plan for position".
- The modal opens with the incumbent employee's name and position pre-filled.
- In the Successor search field, type the name of the intended successor. A dropdown appears — select the correct person.
- Set the Readiness Level:
- Ready Now — The successor can step in immediately.
- Ready Later — The successor needs 1–2 years of development.
- Ready Future — The successor is a long-term candidate (3+ years).
- Click Save.
Option B: Succession Plan for a Role
- Select "Create succession plan for role".
- Search for the role name and the successor employee.
- Set the Readiness Level and click Save.
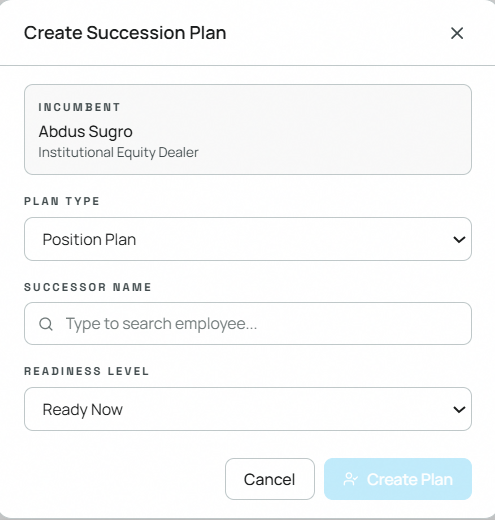
💡 Tip: Each save is logged to the Intelligence Feed on your Home dashboard.
Common mistakes to avoid:
- Searching for the successor by job title instead of name — the successor search field matches on employee names.
- Forgetting to set the Readiness Level — the default may not reflect the actual readiness of your candidate.
Managing Successors
To view and manage existing successors for an employee:
- Click the employee's name on their card.
- The Succession Side Panel slides in from the right.
- You'll see all current successors with their readiness level badges.
- To remove a successor, click the × button on their successor card.
- Close the panel by pressing Escape or clicking outside the panel.
Tagging Profile Criticality
Mark employees as critical or high-potential to increase their visibility in alerts and succession planning.
- Click the "◇ Tag" button on any employee card.
- In the modal, tick the appropriate checkboxes:
- Potential Talent — marks the employee as high-potential for targeted development
- Critical Role — marks the employee's role as business-critical, increasing visibility in the Home Alerts panel
- Click Save Tags.
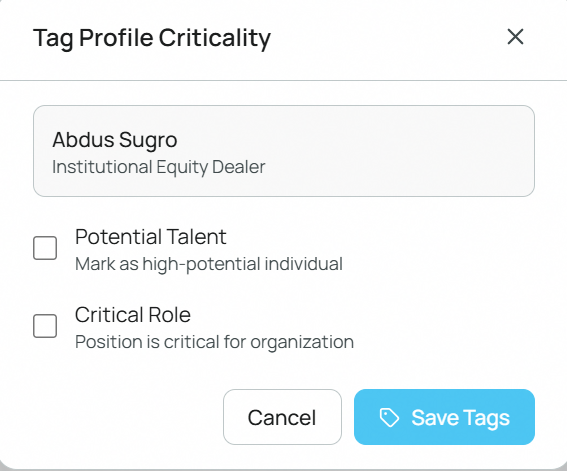
⚠️ Warning: Tagging or un-tagging a profile marks that employee's AI career paths and fit scores as outdated. The next time you open their Career Navigator page, the AI will automatically recalculate.
Importing Data in Bulk
The Bulk Import feature lets you update talent profiles, LinkedIn skills, LinkedIn work experience, and development plans for many employees at once using a spreadsheet.
Step 1: Download a Template
- Click the Import button in the Talent Finder toolbar.
- In the Bulk Import modal, select the import type from the dropdown.
- Click Download Template to get a pre-formatted file.
- Fill in your data following the column headers exactly. Don't delete or rename the header row.
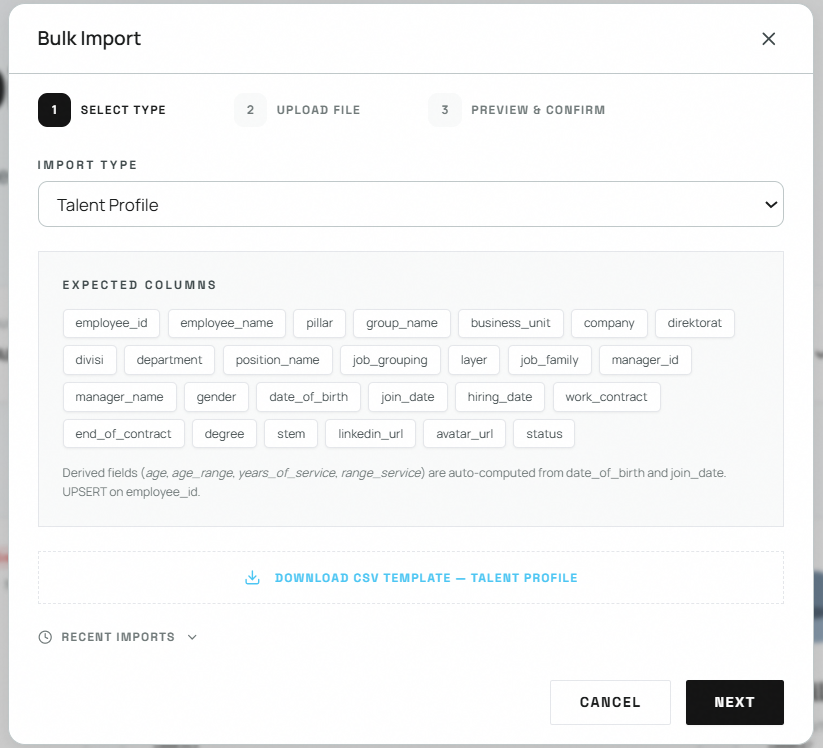
Required columns per import type:
| Import Type | Required Columns |
|---|---|
| Talent Profile | employee_id, employee_name, business_unit, position_name, layer, status |
| Development Plan | employee_id, plan_title, target_role_name, status, start_date, end_date |
| LinkedIn Profile | personnel_number, employee_name, linkedin_profile_url, business_unit |
Step 2: Upload & Validate
- Click Next after selecting your import type.
- Drag your completed file onto the upload area, or click to browse and select it.
- Accepted formats:
.csvor.xlsx. Maximum file size: 5 MB. - The system validates every row and shows a summary:
- Total rows — how many data rows were found
- Valid rows — rows that passed all checks
- Error rows — rows with problems
- If there are errors, an Error Detail table appears with the row number, the problematic column, and a plain-language description of the issue.
- Click Download Error Report to export the error list as a CSV file so you can fix and re-upload.
💡 Tip: Errors only block the affected rows. Valid rows can still be imported even if some rows have errors.
Step 3: Review & Confirm
- Review the preview of the first 10 valid rows. Each row is labelled new (will be inserted) or update (will overwrite an existing record).
- Click Confirm Import to write all valid rows to the database.
- For LinkedIn Profile jobs, Step 3 shows a progress tracker instead of a preview — the system polls API until all profiles are scraped, then writes the results automatically. No manual confirm is needed.
- Check the Import History section at the bottom of the modal to verify the import completed (shows last 5 imports with timestamps and record counts).
Common mistakes to avoid:
- Renaming or reordering columns in the template — the system expects exact column names in the header row.
- Using values not in the allowed list (e.g., writing "Excellent" instead of "Very High" for performance category) — check row 2 of the template for allowed values.
- Uploading files larger than 5 MB — split large datasets into multiple files.
- Submitting a LinkedIn Profile file with private or deactivated LinkedIn profile URLs — those rows will fail silently at the scraping stage and will not appear in results.